We have some exciting news! Of course it is a little without anticipation since you likely read the banner at the top of the post but we are excited none the less to announce that we are having a Boy’s tee-shirt week! That’s right, I have a little boy in my life who is starting preschool in a few short weeks, and so I reckon it is time to get the kids back to school and we thought we would kick things off with the boy essential. A rocking tee-shirt. So here’s to a week full of boys tee shirts (let’s pretend we are all toasting right now *clink*) We also started a flickr group a new one just for boys tee shirts. We know you have a million ideas out there as well and we want to see them so upload them to the flickr group and come Saturday we will be sharing our favorites!
(if you have any trouble uploading a picture to the group email it to us we would love to see it)
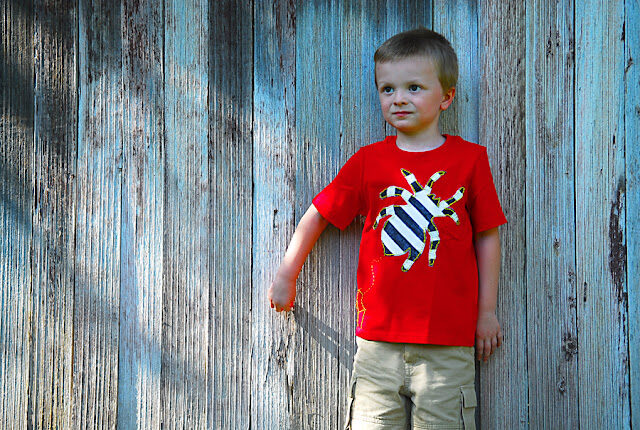
I started the week with this little number from mini boden. I pinned it a while back. I loved the bold stripes but wasn’t crazy about the spider. My son on the other hand loved the spider. He is a boy after all and loves all things creepy crawly. So I decided we would go ahead and make a spider.
So I give you the Spider Tee. Which is super easy and besides being a pretty basic applique, I have a fun technique to share with you.
I started by making a patch. I do this often for tons of projects, I shared more details on how this is done back on THIS POST. A quick run down I use jersey knit the most it’s my favorite since it is soft and it doesn’t fray, if you keep solid white in stock like I do (always pick some up from the remanent bin for 50% off) then you can dye it color it or do what you want with it and you will always have many options for “patch” making which is really just applique but I like to call them patches. Iron on fusible interfacing to the jersey knit and then cut out the shape you want. In this case a spider. You get a nice clean cut and you can get really detailed if you like. Then I taped Mr. spider down to some cardboard. I used the tape to define my lines. Then using felt tip fabric markers (found in the fabric dye and paint section of a craft store) I used black and simply colored in the white spaces.
Once it dries remove the tape and there you have it some nice bold stripes. Iron the patch to seal the color.
Then I pinned the spider to the shirt (I used a pocket tee from old navy they were on sale for 4 dollars, I just removed and saved the pocket.) Then I used embroidery floss and do a back stitch all around the edge. I decided to do a contrast color for a little fun.
Then you are done. As a side note you can color the lines in solid unlike my “faded” looking lines I just liked the slightly worn look, but the markers will color solid.
Jude asked me where his web was so I added a trail and web in the corner.
There you have it tee shirt number one.
Bold stripes… Check! Creepy crawly bug… Check!
Happy boy… Check!
I just can’t believe he will be off to preschool in a few weeks. He is growing up so fast, but at the same time I am so excited to have him start his new adventure. He is too especially with his new shirts 🙂


Rachel
I love your spider!
Jessica at Me Sew Crazy
Ahhh – I hate spiders! But this is indeed a fantastic shirt for a little boy :). Love the bold stripes!
casserole
The Mini Boden shirt is cute, but yours is waaaay better! I love the weathered looking stripes! I scheduled a post for tomorrow night on Craft Gossip to link to your tutorial:<br />http://sewing.craftgossip.com/tutorial-boys-spider-tee/2011/08/02/<br />(link will show as broken until it goes live tomorrow night)<br />–Anne
Nancy
The way you designed your spider is 10x better than the one on mini boden, I especially like the embroidery detail (outline and web). I'll have to keep this in mind for when my boy gets a little older. Thanks!
Lettie
Super cute shirt. I'm excited to see people's ideas pour into the flickr group. Smart thinking. I see shirts at the store and think – oh, I should totally make something similar. Then I buy blank shirts and can't think of any ideas once it is time to start!