
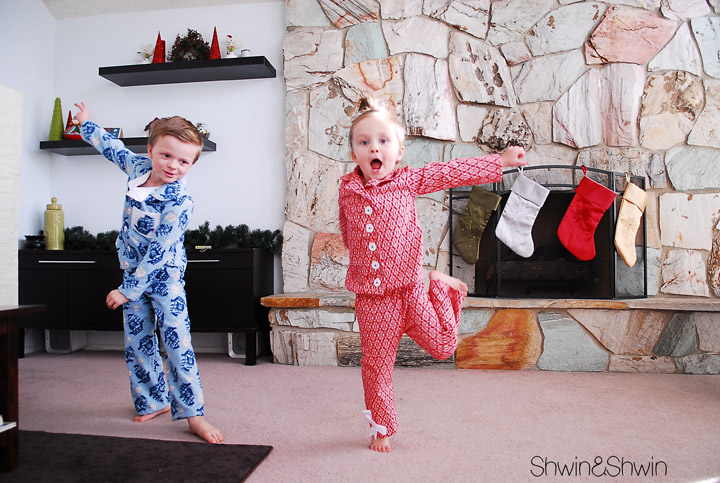
Ok guys it’s here! Something I have been working on for quite some time, but finally everything came together (except my two clown models who thought they were sooo funny showing off their pj’s) It’s the last free pattern of the year! What better than to have some Christmas Pajamas? We have been having a Pajama-Rama around here over the past 5 weeks I have made each kid 4 pairs, and still have some cut and ready to sew, (although I doubt they will be finished before the arrival of this baby). So if you’re looking for some cute clothing to keep you cozy this winter, why not try out this pattern?

Sewing the Pajama top is easy:
1. Sew front and back top pieces together at shoulders
2. Sew front and back facings together at the shoulders


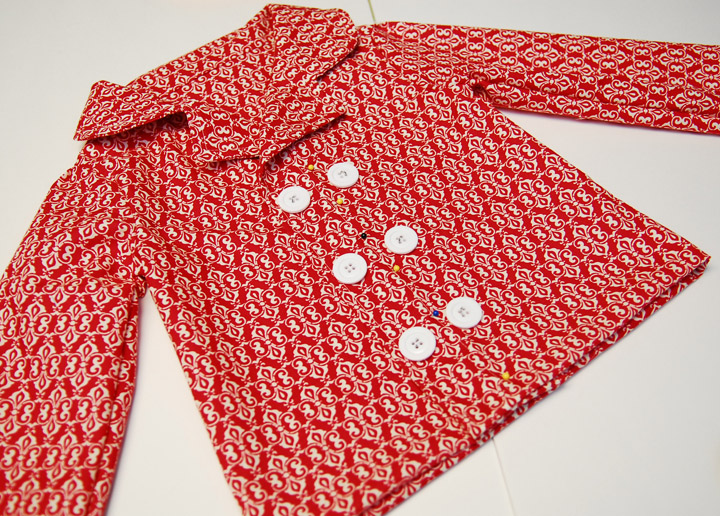
9. Lastly add your buttons and button holes. I actually opted for a single row, but I considered doing a double row (hence the picture)
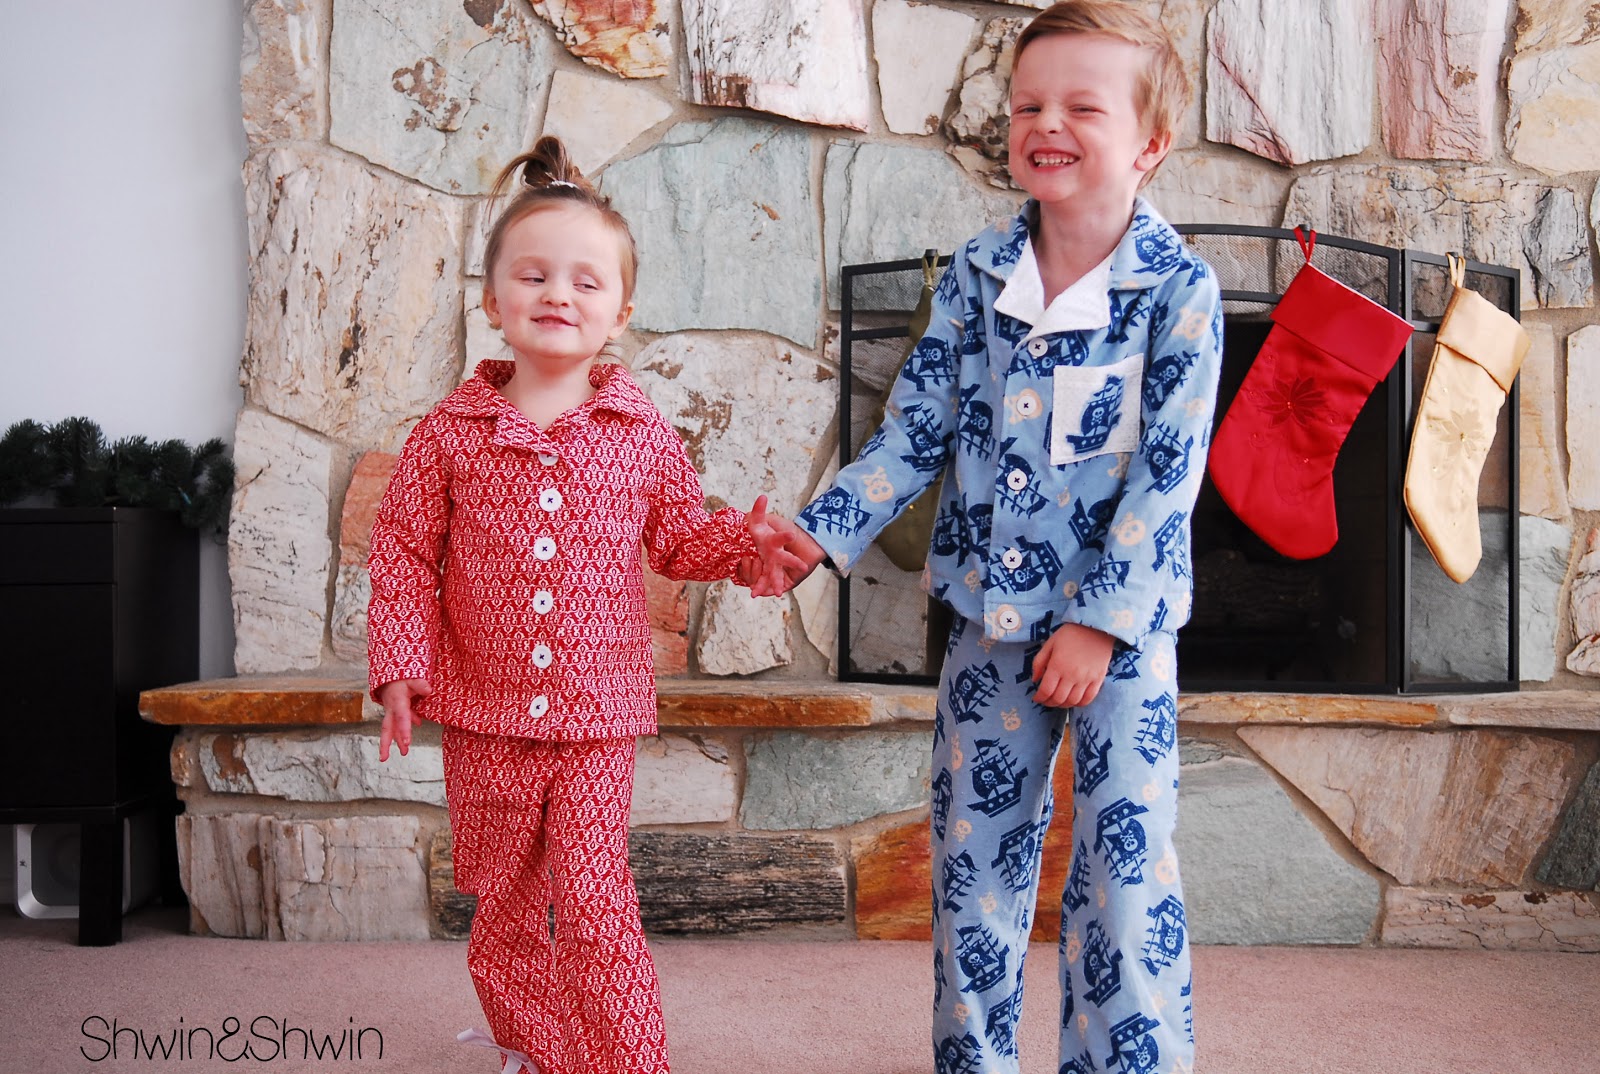
Now you have some sweet new Christmas Pajamas. For the ones Jude is wearing in these pictures I also added a chest pocket but simply cutting a square and sewing it on, with an added applique of the pirate ship. I also used a contrast fabric for the facing just for fun. Abbey’s got a little ribbon bow at the ankle, which is hard to see in most the pictures but it was a fun little detail.

Both kids were pleased as punch to get a stack of new pajamas. Something they normally open on Christmas eve, but this year it cam early 🙂

Enjoy making some cozy Pajamas!
Jessica at Me Sew Crazy
You are amazing! And how cute are your kiddos…love the jammies!
Jenni
Very fun! I'm impressed that you are still sewing and pattern designing with baby girl due any day! Thanks for the free pattern! 🙂
eat. sleep. MAKE.
Awesome (and so excited that you included a 4t pattern, which my daughter happens to be in 🙂 Thank you so much for the great pattern!<br />-Jen
Krista Hansen
Your kids are so cute and hilarious!! Thanks for the fun pattern.
Suzanne Winter
I've been looking for this for weeks (not that I couldn't have bought many others ;op)… of course now I have to figure out how to size down the size 4 to a 2T ;o) You are amazing… you are going to see quite a few of your tutorials being used by me when I make baby girl's spring wardrobe!
kate
your house looks awesome! thanks for the free pattern, i love the buttons!
Emskyrooney
So great! Thanks so much for sharing!
Max of Max California ★
Oh how cute are the bows at her ankles?!
Natalie
Yay! I planned on doing mine tomorrow, so this couldn't have come at a better time. Thanks for all your hard work. 🙂 It helps those of us who have never drafted our own pattern before… and are scared to do it. 🙂
Олеся Ершова -Москвина
Вдохновляюсь вашими работами.Вы умница!!!
Jennifer
I've included your awesome tutorial on my blog: http://www.love-jujubeancreations.blogspot.com<br />
{jen} iCandyhandmade
SO AWESOME!!!
Emily
Darling!!!
Tammy
I printed out your pattern today and tried to get started but I can't seem to find the shirt facings in the pattern pieces. Am I missing them somewhere? Please let me know where to find them or if I need to create my own somehow. I am excited to try making some. Thanks so much for sharing the pattern.
Shauna@shwinandshwin
The facing is shown on the pattern pieces with different colored lines, you will have to trace the pattern or cut the facings last.
Tammy
Duh! Now I see where you explained all that on the pattern. Sorry for being the slacker who didn't read all the instructions first. Thanks again.
Jessie
About how many yards does it take to make them
Shauna@shwinandshwin
I used 1 1/2 yards total for the size 4T (since it could be used any direction) For Jude's (about a 6) I used 2 yards, and some scraps of another fabric for the facing. If you are using fabric that can only be used one direction I would recommend 2 yards for the 4T even. Most the tops I cut out of one direction prints took most of a whole yard and then I could get the pants out of the
mary johnson
seam allowice ? no interfacing?
Jessie
Thank-you
Jessie
Just wanted to say thank you again for this pattern. I have made a size 5, 6, two 2 and from the pattern guide paper with a little altering I make 2 matching jammies for my girls 14 in Disney princess dolls. So thank you thank you thank you
opper windfrey
Excellent tutorial post about pajamas making. 🙂 Thank you so much for this, so far I have a lot of free time in my hands and this is probably the best that I can spend them as of now. These <a href="http://footedpajamas.com.au/" rel="nofollow">pajamas australia</a> are just amazing!
NORAZLINA YAAKOP
So lovely. How do you adjust the patern from 4T to 3T. I love to try it.<br />Ina
Linda K
I Just love this! Is it possible to make the pattern in other sizes?
Avira Gp
Thanks for sharing such kind of nice and wonderful collection……Nice post Dude keep it up.<br />I have appreciate with getting lot of good and reliable and legislative information with your post……<br /><br /><a href="http://www.thepyjamafactory.com/" rel="nofollow"> Fireman Sam Pyjamas</a><br />
Nur Zahan
Hi – It’s good to read such interesting stuff on the Internet as I have been able to discover here. I agree with much of what is written here and I’ll be coming back to this website again. Thanks again for posting such great reading material!!<br /><br /><a href="http://www.thepyjamafactory.com/" rel="nofollow">Boys pyjama</a>
Shachi Sharma
Your blogs are delightful to read. You're funny, honest and straight to the point. Anyone who calls you "friend" is certainly blessed. I particularly liked this piece, it spoke to my heart. Thank you, take care and keep on writing.<br /><br />Feel free to visit this site …<br /><a href="http://www.thepyjamafactory.com/" rel="nofollow"> Disney Pyjamas</a><br />
Becca Saur
Hi I've read, re-read the instructions and cut the facing pieces twice and I'm still not doing something right. I'm new to sewing and it just doesn't make sense to me. Please help!
Chapel Taylor-Olsen
I am also having trouble with the facings. I see the different lines on the Pajama Top front and back piece, but it just isn't making sense to me. Do I cut with the red line as the far left or the far right part of the facing? Can I make the top without facings?
Anne LK
I am (was?) having the same problem. I think that the front facing is the blue to the red line, and the back facing is the green to the black line.<br />You pretty much do need the facings otherwise you have nearly raw edges where you sew on the buttons and make buttonholes. If you look at the steps on her page, step 2 is sewing the facings together, and based on that photo I've deduced
Bec
Brilliant! Thankyou 🙂
michelle
Thank you so much for this explanation! I too was having trouble knowing which lines to cut as the other sides of the facings (lots of material wasted before I found these comments to clarify). Thanks for explaining that the red lines and blue lines made the front facing and the green lines up to black line made back facing. I couldn’t manage to wrap my mind around how to get the right shapes/cuts based on the photo. Thanks so much for the pattern!!
Paula
I'm confused with the facings too. I'm not quite getting cuts like the picture. I'm not sure HOW/WHERE to cut. :/
Mrs. Belzer
Glad I'm not the only one struggling with the facing… too bad the directions and pattern were not more clear. Thanks for the suggestion Anne. That seems to make sense looking at what you described. Looks like I will have to recut the facings because mine do not look like the picture in step 2 either. 🙁
Shantel Jones
I added this to my KCW shout out this week!<br />http://seemesew.blogspot.com/
PH11
I love love love your post. Had purchased few patterns before but never realized you had such a cute pattern for free! will definitely try it out soon. Thanks again!
PH11
Hi! I have managed to complete the pajama for my little boy, he was so happy! (And mommy too… Thanks!) i posted it here http://funwithlittleones.blogspot.com/2013/12/the-1st-christmas-pajamas.html<br /><br />However, my version seem different from the original as posted here coz I could not figured out the facing (step2-3), so I had to make some changes to complete the project.i wish i have
anon
This comment has been removed by the author.
Nick Taylor
Hi<br /> I admire the valuable information you offer in your blog.I impress your designed in kids Pajama and other fashionable products come with gorgeous, unique gift boxes that will make you sleep a little easier. Visit us online <a href="http://www.divinedreamssleepwear.com.au/sleepyhead-t-shirt-and-car-dreams-pyjama-pants/" rel="nofollow"><b>Pyjama Pants</b></a><br />to know more.
The Big List of Free Sewing Patterns for Boys
[…] Pajamas […]
HOW TO turn characters into clothes | kids clothes week blog
[…] Peter Pan by J.M. Barrie 2 Christmas pajamas (Shwin&Shwin free pattern) 3 Sadie Grace nightgown (seamingly smitten) 4 Classic footed pajamas […]
quaarnitah
can i buy this pattern? my son is 1 and would really love it for him!
Pajama Rama 2014 || Knit Pajamas || Free Pattern - Shwin&Shwin
[…] pajama time. I make my kids a slew of pajamas every year. In several styles. So 2 years ago it was THESE (with free pattern) Last year I made them using this pattern that finally made it to the shop. And while I will very […]
Melanie
…wow! Where did you get the nice fabrics?
hayden
I cannot understand the facings at all. Could you help? The picture you posted of step 2 doesn’t look like the pattern. Is there something I am missing??
TL
I see your pattern has “3/8″ seam allowance”. Does that mean the seam allowance is included, or do I need to cut an extra 3/8″ fabric? Also, what about the casing for the waist elastic for the pants, do I need extra fabric on top of the pattern for that? Excited to have found your pattern. My son wants to be man in the yellow hat for Halloween and I haven’t been able to find any bright yellow clothes. Any suggestions on trying to make the collar more like a dress shirt collar? I’m new to sewing clothes. Thank you!
Judy
I appreciate the free pattern and the PJs look so sweet on your kids. Is there any chance you could respond to the questions about the facing or the question about the 3/8 inch inseam being included in the pattern size? I’m having a horrible time with it as well and I’m not a beginner at all. The collar comes all the way to the ends of the front, which you say it shouldn’t. I’m thinking that I needed to add the 3/8 inch inseam to the pattern but I don’t want to waste any more fabric by re-cutting the whole thing. I’m living overseas and it’s very hard for me to get decent fabric, let alone flannel, so I was working with what I had on hand; I don’t have the privilege of starting over. Please explain the facing, or the seam allowance and how the collar should fit. Thank you.
Shauna
The 3/8″ seam allowance is included in the pattern you don’t need to add it. The collar shouldn’t come all the way to the end of the front, there are so many things that could have happened that cause this, the front could have been cut wrong, the pattern could have printed wrong, the fabrics may not be eased properly. The easiest way to fix this if everything seems to be fitting correctly is to just trim the collar a bit so it doesn’t come all the way to the end.
Judy
Thank you, I shortened the collar and it all seems to be working out now. I think there must be an issue with the way the pattern printed because the facing doesn’t seem to be as wide as it shows in your pictures. I’ve got some fabric on order and I’m going to try to make a few more of these PJs when it arrives. I’ll make a few adjustments to the pattern as I do. All in all though it’s a super easy pattern and it really took me no time at all to make these once I got the collar worked out. I’m so glad you offered this pattern online, I’ve been living in Turkey for the last year and a half (with another year and a half to go) and I can’t run out to the fabric store to buy a pattern whenever I get the urge to sew, so thank you for that!
Becky
Hello! Thank you so much for the pattern! I’ve made the pants and LOVE them. I’m now getting around to making the top, and I don’t think I’m understanding the instructions for sewing it together. I thought I had the collars sewn properly to each, the front/back piece & the front /back facing, but mine don’t seem to look like yours. My collar has raw edges and yours looks like it might be serged..? And I completely can’t seem to grasp how to sew them together. Is there something more descriptive you could recommend for me to figure out what I’m missing ? I have all the pieces cut and would really like to finish it 🙂 thank you!
Bec
Hi. Did you figure it out? Check out what ANNE LK says above. You cut between the blue and red lines for the front facing, and for the back facing from the green line UP to the black line. Really small pieces like in the picture. I’m going to use my incorrectly cut pieces to make another top – see if I can make it work. Otherwise it’s a huge waste of fabric. Fortunately I have a bit left over to do that. 🙂
Heidi
Hello! Have you been able to fix the size of the facing? It’s too small compared to the size in your pictures. The pattern printed properly, I measured the sample inch square. Otherwise, it’s a good pattern, thank you.
45 Free Sewing Patterns for Every Ability - Hobbycraft Blog
[…] Pajama Rama Pattern by Shwin and Shwin […]
Dreamtime Jammies | mahlicadesigns
[…] pjs using the Pajama Rama pattern from ShwinandShwin have been my standard, but I’ve mixed things up a bit by sewing a […]
Vineela
Hi…I am a beginner …and this will be my first attempt in sewing…I just dint get how many yards of cloth do we need for the pyjama set for 4T size and 7 size?
Thanks in advance 🙂
Shailja
Thank you so much for the Pattern. So generous of you. But I am really confused with the instructions of the shirt. About the Collar, if you sew as instructed above, won’t it have raw open edges? Shouldn’t both the pieces of collar first sewn together and turned around to have neat edges and then attached between Facing and Bodice?
Shanthi Siri
Hi I need to make pj’s in 6t. Can someone please help me with the sizing pls.
Engel
Hi, the link for the pattern seem broken, can you fix it?
Anyone can share?
Boy Pajamas :: Sewing Blue
[…] up pajamas say “Holidays” all over them, don’t they? These cute ones by Shwin & Shwin come with a free 4T pattern. She gives suggestions for modifying the size if you need to go that […]
Sunni
Thanks for the hard work you put into sharing this pattern with us! I included it on my blog in a roundup of boy-approved pajama patterns.
https://sewingblue.com/2017/12/01/boy-pajamas/
Anna
I had a flannel fitted sheet leftover from a king sized sheet set I bought for quilt backing. These sewed up BEAUTIFULLY! I ripped out the collar a few times, but finally got it right. And I used snaps so my toddler could dress himself. Ended up using the same pattern to guesstimate a 12-18m pattern for my daughter too. I can’t wait for my kids to try on their matching jammies (might have made my husband some pants and me a nightdress to match too!). Thanks again for the generous pattern – I’m SO proud of how they turned out.
Elva Roberts
I love the pattern for winter pj’s. I really like this pattern and will look into it further. Thank you for sharing.
Holly Elliott
HI I really love this pattern! have made it twice for my niece. I was wondering how to make it smaller for a 2 year old?
Cynthia Sears
I too was confused by facings, I think I have it figured out but on page 8 there is a curve, is this the pleat in the girl sleeve you talk about? Also the narrow strip that says pants is that to be connected to the piece with the what looks like a plunging neckline, I’m very confused, perhaps a pic of the pieces laid out for cutting would be helpful
Saundre
. i just want to know what i did wrong my facing pieces does not look like in the picture.. i have cut on the red and on the green line but where do you go with your straight line?? I followed the solid black line as fornthe top pieces.. Please help..
Jen D
Your kids are sooooo photogenic