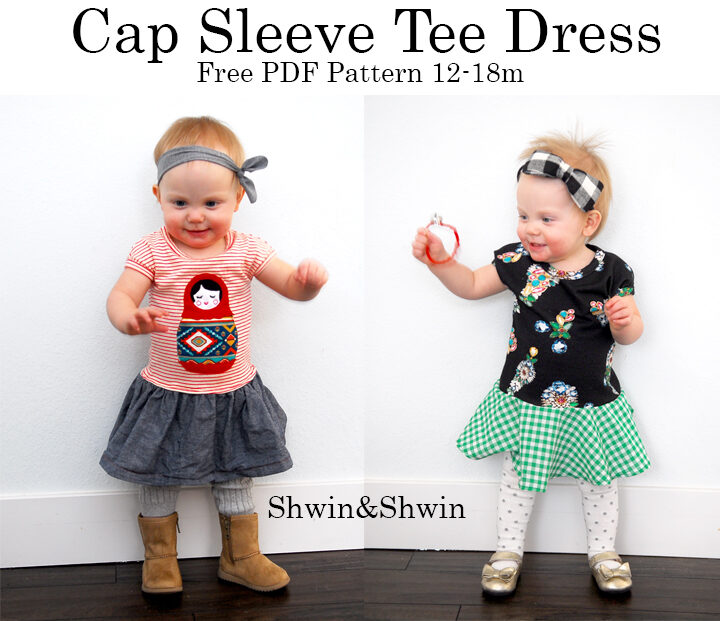

Today’s free pattern is a quick and easy dress. (or tee shirt if you rather) It has two skirt options and is fashioned after some of my favorite dresses from Zara’s, drop waisted tee shirts with skirts attached. They are easy to make and effortless to wear. I happened to make two for Penny who has been in need of some dresses lately.

One I had fun print matching because babies can get away with anything. I used an AMAZING french terry fabric I picked up from Britex in SF. It’s super soft, stretchy and that print, I mean seriously, and gingham goes with everything. (or it should)

For the second one I made I added the nesting doll appliqué (free pattern from yesterday) I added a gathered skirt to this one for something different, because I love mixing things up.
So if you want the pattern it’s around a 12-18m size I think, maybe a bit on the small side, Penny is 12 months, and pretty small for her age (30%) it fits her about how most 12m stuff fits, and I drafted it based on a 12-18m tee, so it’s somewhere in there 🙂

To start sew the front and back together at the shoulders.

Press seams, then have the wrong side face up.

Fold the neck binding so right sides are together and sew the edges so you are creating a band. You should stop here and check that the binding fits over the head. (should fit up to 16.5″ easily)

Then with right side of the binding to wrong side of the neckline pin the binding in place. You will have to stretch the binding to fit and you want the seam to be center back. Then sew the binding in place stretching as you sew.

From the right side of the top press the neck binding up.

Then fold the binding in half and in half again so the folded edge covers the stitch line.

Stitch the folded binding down by sewing right along the edge. (stretch as you sew)

Now for the arm binding. again right side of binding toward the wrong side of bodice. You want the center of the binding to match the shoulder seam ant the ends will meet at the “sleeve end” marking from the pattern. Stretch to fit and sew in place.

Then fold the binding in half and in half again so the fold covers the seam just as you did with the neck. Repeat with other sleeve.

Now with the shirt right sides together sew from the bottom up to the sleeves angle right off the bottom of the sleeve binding.

For the circle skirt match the skirt right sides together with the bottom of the bodice and sew in place. Then hem the bottom of the circle.

For the gathered skirt I cut a rectangle that was 8″X45″ I gathered the top and then sewed the two edges together to make a loop. Then I sewed the skirt right sides together just like the circle skirt. Then hem the bottom.

Top stitch the skirt and shirt in place if you desire. That’s all there is to it.

Easily worn with some leggings and boots for a cozy look…

Or tights and Mary Janes for a look that’s ready to party. (she really liked that bell)
Details:
Look One:
Printed French Terry || Britex Fabric in San Francisco
Green Gingham || Joann Fabrics
Polka Dot Tights || Target
Mary Jane Shoes || Target
Bow Headband || Target
Look Two:
Striped Knit || Girl Charlee
Stretch Linen Chambray || Michael Levine
Nesting Doll Applique || Fabric from Girl Charlee || Free Pattern HERE
Leggings || Target
Boots || Target
Headband || Made by me (just knit fabric tied in a knot)
Monica Swift
Adorable!! Love that nesting doll applique with the denim skirt.
Shauna@shwinandshwin
Thanks! It's one of my favorites too!
Anne Weaver
cute, cute! I've got a Craft Gossip post scheduled for later today that links to your post: http://sewing.craftgossip.com/free-pattern-baby-girl-cap-sleeve-dress/2014/01/07/<br />–Anne
Shauna@shwinandshwin
Thanks!
Paisley Roots
she is a doll!
Shauna@shwinandshwin
Aw thanks! I tend to think so too 🙂
Sew Much Ado
I love these little dresses Shauna! So cute!
Shauna@shwinandshwin
Thanks Abby! You are too sweet!
Jess and Steve
Cute as a button!
Shauna@shwinandshwin
Thanks!
Emily
Oh so cute dresses and Miss Penny!
Mareike
Thanks again! So kind of you to share it for free! All the hard work!!! With 3 kiddos!!! Deep respect!!!!
RobyGiup
Absolutely lovely! I mean, the dresses and the girl! 🙂
The Brullooly Family
Any chance you'll be making this in larger sizes as a pattern to sell? 🙂
buttonbridge
I love how it's a whole outfit in one article of clothing. I made a version here: http://buttonbridge.wordpress.com/2014/01/24/cap-sleeve-tee-dress-by-shwin-shwin/<br />Thank you for sharing the free pattern!
Bjlam
This is a wonderful tutorial! I wish I'd found your blog sooner, as my sweet little friend is turning 2 soon, and has outgrown the 18 month size. What the sewing world needs is a tutorial explaining how to increase/decrease the size of a pattern. In a multi-size pattern, it's fairly easy to see how to increase the size, since you already have an idea of how much is added, and where, to
Cap Sleeve Peplum || Free Pattern || Shwin&Shwin
[…] fall pieces. I pulled out some old favorite patterns and made her a whole new outfit. I used the Cap Sleeve Dress Pattern a free pattern I shared a while back on the blog. (and oh my has penny grown! But not really because […]
Marilyn
Does the circle skirt have two side seams? If so, how big are the seams? Thank you.
Shauna
no, there aren’t any seams the circle skirt is cut on two folded edges so it is a ring shape when unfolded.
How to Upcycle a Cardigan • Heather Handmade
[…] Pattern – I used the free Cap Sleeve Tee pattern by Shwin and […]
How to Upcycle a T-shirt Neckline • Heather Handmade
[…] Pattern – I used the free Cap Sleeve Tee pattern by Shwin and […]