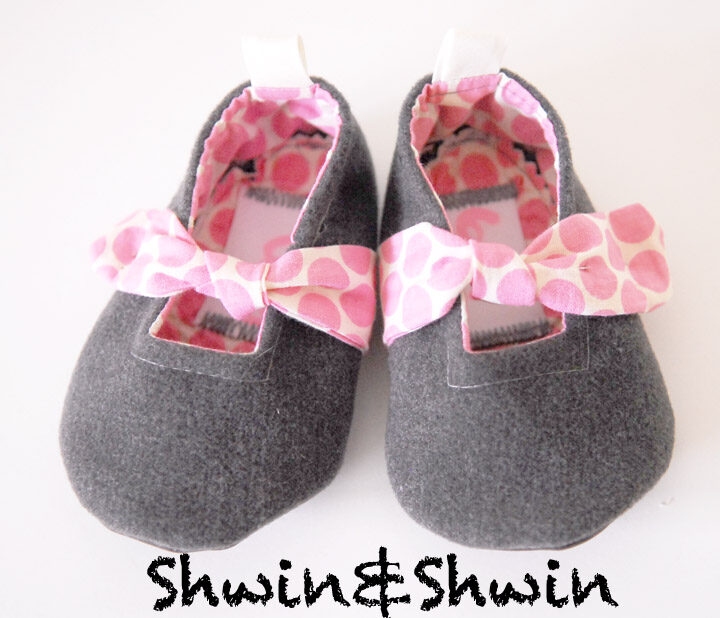
It’s the first day of Free Pattern Week! Also before you go thinking that I am whipping these all out now, while taking care of a newborn and two other kids, rest assured I made all the patterns for free pattern week several months ago to prepare for this time :)Today’s free pattern is for some baby shoes. Because honestly who doesn’t love a pair of baby shoes? I love making a bunch when I have a babe to fill them, and they are great to hand out as gifts since when I don’t have a baby of my own I always seem to know someone having a baby.
These are just a sweet and simple mary jane style shoe with a knot in the strap for a cute added detail. While they are fairly easy to make. I will warn you baby shoes are not the best “beginner” project. They are small, curvy and can be a little tricky to sew. That being said, they take almost no material and the pattern is free so go ahead and give them a try 🙂
Supplies:
Pattern Found HERE for 0-3m, 3-6m & 6-12m
Here is what I used for mine (6-12m)
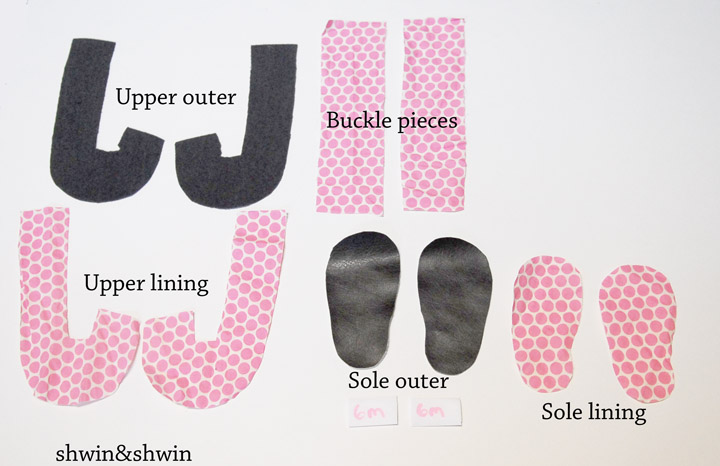
- About 1/4 yard of pink polka dot cotton for lining and buckle
- Scraps of poly wool blend for upper outer
- Scraps of pleather for soles
- Two scraps of bias tape to make tags
- Scraps of wonder under cut from the sole piece
Make sure when you cut out the pieces you are cutting a reverse of each piece so you have a left and right foot.
- I started by adding my tags to the sole lining. I like when things are marked size especially if you are giving them as a gift.
- Press the wonder under to the sole lining. Then press the sole lining to the sole outer so they are stuck together. This is optional but it helps when sewing later if they don’t slip around on you.
- Now with right sides together sew the inside edge of the upper pieces together (follow the black dotted line) *optional I added a little back loop
- Then with right sides together you are going to sew the two straight edges together. (the “top of the J and the end of the J”) You are sewing the side seam so you want the lining matched with the lining and outer matched with the outer.
- Then turn the lining to the inside. You can top stitch the top edge if you like at this point.
- Now fold the buckle pieces in half length wise and sew the top and side. Turn right side out.
- Tie the buckle piece in a knot. You want the knot towards the end with finished edge. The strap will be much longer than you need. Then pin the finished edge in place on the side without the seam. The knot should be centered over the opening, and then pin the rest of the strap in place so it covers the side seam. Trim away the extra.
- Then with right sides together sew the upper to the sole. The side seam (with strap) should be sewn to the inward curve of the sole, so the buckle is on the outside of each shoe. Be careful NOT to sew the finished side of the buckle into the sole.
- Turn shoes right side out and add a snap (sewn on snap) to the buckle piece and side so the buckle can open and close.
Then you have some cute little mary jane style shoes with a cute little knot.
They are the perfect “girly touch” without being over the top.
If you make some share them in our Flickr group!(link at top of page) We would love to see them!


{jen} iCandyhandmade
ADORABLE! So cute. Wish I had a baby to fill those. Sigh.
Jenni
Thanks for the free pattern. I love baby shoes. The material you chose is gorgeous!
Elisabetta
thank you so much for the pattern and great tutorial ^_^
Maria
Cute, cute, cuuuuuuuuuute! thanks for the tutorial and free! pattern
Jo
Too cute! Shame I don't have a baby to sew for.
rhiannon padgett
So cute! My girlie is needing new shoes!! So excited for a week of freebies!
Meghan
These are adorable! Thanks so much for sharing! 🙂
Laura @ ON{thelaundry}LINE
Aw man, I may just have to whip some of these up for my little niece to go with the dress I made her! Too cute!
{IrisM}
OK I don't sew but you guys seriously make me want to ! <br />Great job!<br /><br />Iris the frenchie <br />http://matthewandiris.blogspot.com
Emily
So sweet!!
hams john
wow you look stunninasdg doll each piece and well put together. Also id love to hear your thoughts on my latest outfit post <a href="http://www.louboutin-hommes.org/" rel="nofollow">louboutin shoes</a>
Brooke
These are lovely! Thank you for sharing with us! I might need to whip a pair of these up for my baby girl. 🙂
Jen
Thank you for the tutorial, I made these earlier today but I didn't understand how to make the strap and snap part, so I used ribbon instead. Everything else was totally easy, so much better than other tutorials I've seen.<br />
mummsie
I want to make these…… Guess they'd look funny on my nephew???
Sue Niven
They are simply divine, thanks for the pattern. I do not have a baby for them yet, but I will hope to have grand kids some day!
city
thanks for share<a href="http://www.cool007.org/" title="徵信" rel="nofollow">.</a><a href="http://www.daai007.org/" title="徵信社" rel="nofollow">.</a><a href="http://hotprivateeye.com/" title="徵信社" rel="nofollow">.</a><a href="http://ladies.creditbox.org/" title="私家偵探社" rel="nofollow">.</a><a href="http://www.detective-safeguard.org/" title="私家偵探社" rel="nofollow">.</a><br />
Rebadeba
I tried these and the little man shoes- great patterns and tutorials. Thank you so much. I am off to a baby shower for twins with truly special gifts thanks to you!
Artyfartygirl
sooooo cute thank you x
hcarthur
Can someone clarify step 4 for me? I'm having trouble seeing what's going on in that picture and the instructions are a bit vague for me. I'm the type that really needs every little step to be clear. Thanks a lot for the pattern!
hcarthur
Can someone clarify step 4 for me? I'm having trouble seeing what's going on in that picture and the instructions are a bit vague for me. I'm the type that really needs every little step to be clear. Thanks a lot for the pattern!
hcarthur
Oh I think I got it! I just experimented until I figured it out! Thanks very much! I also love your sewing 101 series. I refer back to it a lot!
autumnhphotography
I'm really having trouble with step 4 too! Someone please help, I've already started on these! 🙁
SEH
I did it!! And it looks half decent as well!! yay me!!<br /><br />ladies, step 4: you need to attach the top part of the J to the bottom part of the J. Basically you need to take the J and make a circle…ie attach the 2 ends… hope that helps? very late though!! (fold it open, align the seems and attach)
Jessica Buurman
its so sweet.<br /><br /><a href="http://www.babybuurman.com" rel="nofollow">baby designer clothes</a>
Rosangela
Lindo e bem explicado… obrigado por compartilhar.
Obat Pemulihan Pasca Kuret
thanks for sharing
DIY Tutorials for Making Your Own Baby Shoes – DIY Ideas Tips
[…] DIY Tutorial Details […]
cristina
grazieeee!!!!! super belle!!!! dall’Italia… 🙂
Kimberley O'Rourke
My friend and I are challenged with step #4 and cannot get past this step. I have sewn the two ends as instructed, but continue to get a really large shoe that does not seem to make any sense. I’m feeling rather dense at this point. More pics would be appreciated. Can someone contact me at my email address [email protected] to explain. I’m sure it’s me. Thanks so much!
Kimberley O'Rourke
Can someone help me with step 4? I have sewn the ends of the two Js together at each end and now have this enormous looking shoe thing that doesn’t appear right. I am following the steps as are friends and we are not getting it. Help??? [email protected]
Zoe
I also tried to make those but I can’t understand the instructions from step 4 and forward. I was so excited at the beginning but finally I was disappointed. I can’t finger out what I am doing wrong.
Patricia Collier
Thank You for the pattern!! It’s too cute!
Dana
Hi, thanks for the pattern, it is very nice of you to share it. I didn’t understand the 9 step, maybe i didn’t understand the buckle part at all… can you explain it tome please? How the buckle can open and close?
Tank you again
Dana