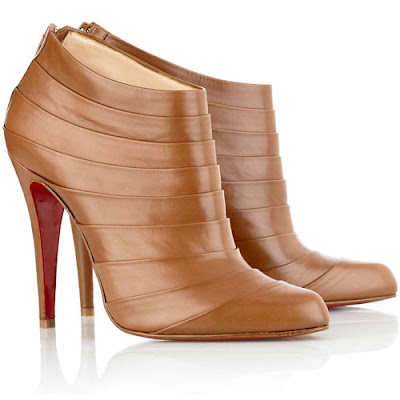
 |
| Today I will share the Abbey Road Boots. They were the boots I made for Project Run and Play. The challenge for that week was adult inspired looks. We were supposed to take adult looks and make them appropriate for a child to “run and play” in (hence the name of the competition) When I made the outfit (seen here) I knew that any adult would pair an adult version with a killer pair of boots. So I made a soft soled version for my little miss. |
 |
| Image source I was inspired by this pair of Christian Louboutin boots, that I love |
 |
| Image source And this lovely pair, also Christian Louboutin. Which I also loved. |
However the heels had to go for the little one and I adapted the styles to be more appropriate and comfortable for my little one.
I named them Abbey Road, for my daughter.
Want to make your own pair? The could not be more easy, although I do apologize in advance that I was sewing late at night, at my mom’s so the pictures are not the best… but I will do my best to walk you through it.
 |
| I started with the pattern I created for these baby shoes and that pattern can be downloaded HERE (I actually downloaded and printed this pattern as a start point for the boots) Then since this pattern was not big enough for my baby that is not a baby anymore. So to start I traced my daughters shoe to use as the sole of the boot. I cut two out of the moleskin and two out of the lining. Then measure around the sole, that is how long the top part of the shoe needs to be (the pattern piece above) You just measure from the top left corner, down around the toe and up the side. The good news is there is no seam in these shoes they just overlap so it doesn’t have to be a perfect measurement. Next I added a curve outward so it would come up higher around the ankle. Lastly you are going to add length to the flap piece so that it can be pleated. Cut two with the length added and two at the regular size. I hope that made sense. |
| Start by putting in pleats so that the top piece becomes the same size as the lining piece. sew them along the sides to hold them in place. |
| Next with right sides together sew the top and lining together along the flap and inside of the piece. |
| The turn it around and topstitch the piece. |
| Next pin it to the sole. You should have some overlap, the flap should be on the inside when they overlap. |
| Every time you come to a pucker, or fold do the same thing, lift the foot and smooth it out. then you will have a nice and smooth heel |
| Then turn it right side out. Add buttons for detail if you like and snaps on the flap and shoe to secure. (sorry I didn’t take a picture of that) |
 |
| Now your Sweet little Miss can have some rockin’ and kid friendly boots. |
Enjoy!
Jessica at Me Sew Crazy
I didn't even see the boots in the photo shoot! Love them, adorable!
Dominique @ Craft Couture
i was hoping that you would do these…i love them! i love that whole outfit actually lol. 🙂
Leslie
These are ADORABLE!!! I have called my sisters and told them about the boots. (my 3 sisters have little girls, I have to little boys =)) I featured you on my blog http://hobbied.blogspot.com. <br /><br />Love all your creations!!!
CraftCrave
Just a quick note to let you know that a link to this post will be placed on <a href="http://www.craftcrave.net" rel="nofollow">CraftCrave</a> today [17 Feb 12:00am GMT]. Thanks, Maria
Galadriel
Could you do a video showing the steps? that would clarify some of the steps for me.<br /><br />thank you in advance
ardiana
Tq for sharing..this is greatest cutest!!! I would like to try it if i have a time..tq again..^___^
Caryl
Such a wonderful blog, can’t wait to have grandkids. I love sewing. Have a daughter that has a dance studio from 2 years to adult. I’m about to make the precious little leotard pattern you sent me. Thank you once again so much. I’m loving seeing all the gorgeous things you have on your blog. I also sew from other clothing items. Have always done that rather, I find it works so well. With the leotard I’m going to make I’ll make a lovely hair accesory to match. Still thinking about how to create it. I’ll be following on Instagram too. Loads of warm wishes. Caryl
Venetta
Hello, I love this shoe and desperately want to make it but I don’t understand the pattern piece. Is there an updated pattern to download where the added length is already there? If not please explain what you mean when you state on the pattern piece to “cut here and add length for sizes 3-12 months?” I am a bit confused on how to distinguish which size is what. I’m looking for a 3-6 months. Thank you.