Lets face it, most of us were not born with the perfect oval shaped face. Contouring and highlighting your face can provide you with the power to sculpt your cheekbones, shorten your nose, and even slim your face.
Things you will need:
~Concealer
~Foundation
~Contouring brush
~Light colored blush
~Light color powder
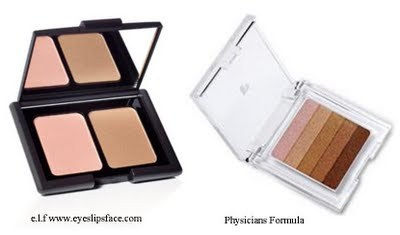
~Dark color powder in the form of a bronzer or a shade darker than your skin tone. I like to use Physicians Formula bronzer for my light and dark shade, e.l.f highlighter/contour powder works great.  STEP ONE: Apply concealer and foundation to even out your skin tone.
 STEP ONE: Apply concealer and foundation to even out your skin tone.
STEP TWO: Highlight your T-zone. I found this diagram below that helps to show each areas. Brush the lighter powder across your forehead, down your nose and at the edge of your chin. This will help to give you the ‘natural glow’.
 |
| Image source |
STEP THREE: Contour your cheekbones by applying the darker shade of powder below the cheekbones. Slightly open your mouth and suck in your cheeks and apply the contour powder where your cheeks are hollow. Practice to see how much dark powder is needed: too little will have no effect, whereas too much will look dirty.
STEP FOUR: Highlight your eyes. Applying concealer and/or highlighting powder under your eyes will help diminish dark circles, and right under your eyebrow will make your eyes pop.
STEP FIVE: Apply a light peach or pink toned blush to the apples of your cheeks for a pop of color. Once you start to get the feel for contouring and highlighting you may apply it to slim down your nose, your face or disguise a double chin. For example, if you want to slim down the widest part of your nose, apply the contouring powder at that location. Same applies for any area, contour to diminish, highlight to bring out.
Your face is a piece of art and contouring is just one technique that can help provide you with a beautiful finished masterpiece. Let me know if you have any questions! Have fun!
Looking for more help with your skin? Check out the products Sodee Naturals has to offer. Use the code: shwin when you check out and you will save 10% off your order.


Jayna Rae
Thanks! Do you have a photo of your conoured self to share?
Shwin R
I changed the post to now include myself contoured, the before and after.
BrittaandGeorge
I should have had you teach me this in person. Gereat post.
sisters4saymoreismore
SO important!!! i love to contour, it changes EVERYTHING! great post!<br /><br />~selina
Jayna Rae
Thanks! I love the change. You look gorgeous both ways, but it is great to see the effect in a more subtle manner than the model photos. This is an awesome tutorial, as pretty much everything you do is.
kdalomia
First off I have to say I LOVE LOVE LOVE your blog! So creative and I am so grateful for your willingness to share your awesome expertise 🙂 I have a quick question since I am so not a makeup or skin expert. As I have gotten older, I have noticed that my pores are getting a little bigger…it is not terrible but how can I prevent it or get rid of it as well as the uneven skin tone and minor
Vasare Nar
wow thats brilliant!
e3ross84
You look purdy in both! 🙂
Wine Lover
How to contour to make my forehead appear shorter???? Tia
Aeryn Kelly-Reitmeyer
I don't see the difference…
Rubes
It would help more if both photos were taken at the same angle. You can't see the contouring at a 3/4 turn compared to the straight-on shot of the first pic.
anjelle-eyes
FYI, that is an incorrect image source. That contoured woman photo actually belongs to makeup artist Kevyn Aucoin, it's his sister actually. This was for his book "Making Faces" which I HIGHLY recommend if you are getting into advances techniques – it is absolutely a brilliant book and teaches you amazing makeup tricks:<br /><br />http://www.amazon.com/gp/customer-media/